Fortunately, we can easily remove the Evaluation Copy Watermark from Windows 10. There are many users who prefer to use a clean desktop. For them, we got ways to remove this watermark. Indeed, seeing this watermark message that your Windows is not activated is really annoying. So without wasting any time let’s see how to remove this watermark from Windows 10 using the below-listed guide.
Remove Activate Windows Watermark from Windows 10
Make sure to create a restore point just in case something goes wrong. In order to ensure that your Windows is not activated, you can follow this guide.
Remove Activate Windows Watermark from Windows 10 Method 1: Use Universal Watermark Disabler Method 2: Remove Watermark using Registry Editor Method 3: Change Ease Of Access Settings Method 4: Activate Windows Method 5: Change the Background image
Method 1: Use Universal Watermark Disabler
A word of caution, before we begin you need to understand that this method can impact the stability of your system. Therefore, you need to make sure that you have a full system back including your personal data. This process is risky since it required replacing the system files, specifically basebrd.dll.mui and shell32.dll.mui. So proceed with caution and use this method at your own risk. This is the easiest method using which you can remove the Evaluation Copy watermark from Windows 10. But you need to use a third-party app called Universal Watermark Remover. The good thing about this app is that there is an “Uninstall” button available that lets you reverse your actions. But make sure you understand changing system files constantly can sooner or later break your PC, so make sure you don’t make a habit of replacing your system files. And remember, although this app work right now but it may or may not work in the future, and may not work in all the situations. Here are some of the functions of Universal Watermark Remover:
Supports all builds from Windows 8 7850 to Windows 10 10240 (and newer). Supports any UI language. Does not delete branding strings (i.e. does not modify system files!). Removes any watermarks including BootSecure, Test Mode, Build string in the evaluation and pre-release builds, “Confidential” warning text and even the build hash.
1.Download Universal Watermark Remover from this link. 2.Extract the zip file on your desktop using the Winrar application.
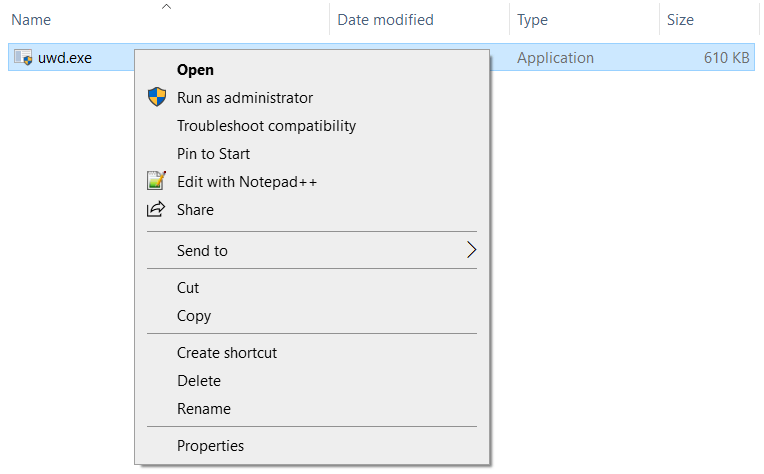
3.Now open the extracted folder then right-click on the UWD.exe file and select Run as administrator.
4.Click Yes on UAC dialog box to continue. 5.This will successfully launch the Universal Watermark Disabler. 6.Now click on the Install button if you see the following message under the status “Ready for installation”.
7.Click OK button to automatically sign out of your Windows.
8.That’s all, log in again and you will see that you have successfully removed Activate Windows Watermark from Windows 10.
Method 2: Remove Watermark using Registry Editor
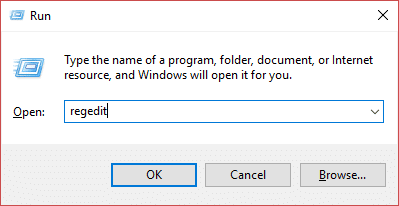
1.Press Windows key + R and type regedit and hit Enter.
2.Inside Registry Editor, navigate to the following location: Computer\HKEY_CURRENT_USER\Control Panel\Desktop
3.Make sure to select Desktop then in right window pane double-click on PaintDesktopVersion. 4.Make sure to change the value data to 0 and click OK to save the setting.
Now reboot your PC and check if the Watermark is removed or not.
Method 3: Change Ease Of Access Settings
Alternatively, you can remove the Watermark through Ease of Access Settings. This one is quite a simple process to remove the background image as well as a watermark.
1.Search for ease of access then click on Ease of Access Center search result from Start Menu.
Alternatively, if you can’t find it using the Start Menu then click on Ease of Access under Control Panel.
2.Click on Make the Computer Easier to see option.
3.Uncheck “Remove background images (where available)“.
4.Click Apply followed by Ok to save the settings. After this, your desktop background will be disappeared along with the Watermark on your desktop.
Method 4: Activate Windows
If you activated your free upgrade to Windows 10 then you won’t get any product key and your Windows will automatically be activated without entering a product key. But if during the reinstallation you’re asked to enter a product key, you could just skip it and your device will automatically activate once you’re connected to the Internet. If you previously used a product key to install and activate Windows 10 then you will need to again enter the product key during reinstallation. Starting with Windows 10 build 14731 you can now link your Microsoft account with Windows 10 digital license which can help you reactivate Windows using the Activation troubleshooter.
Method 5: Change the Background image
Many users reported that changing the background image removes the Watermark. 1.Press Windows key +R and type %appdata% and hit enter.
2.Navigate to Roaming > Microsoft > Windows > Themes. 3.Create a copy of TranscodedWallpaper in Themes directory.
4.Navigate to the View tab and checkmark “File name extensions”. 5.Now open the CachedFiles directory, here you need to right-click on the available images and Rename it. Make sure that you copy the entire name of this image.
6.Go back to the Themes directory. Rename TranscodedWallpaper to the name you copied in the previous step which is CachedImage_1920_1080_POS1.jpg. 7.Copy CachedImage_1920_1080_POS1.jpg to the CachedFiles directory. You need to replace the existing file. Recommended:
The Ultimate Guide to Manage Your Facebook Privacy Settings Fix There is a problem with this website’s security certificate Windows 10 Stuck on Welcome Screen? 10 Ways to Fix it! Fix Spell Check Not Working in Microsoft Word
Once you are done, evaluation watermark will be removed from the Windows 10 operating system. As you can see that removing the watermark is easy with one of our methods. However, if the Watermark is still there, you can simply activate the Windows copy and Watermark will be gone automatically. All the above methods are useful if you want to Remove Activate Windows Watermark from Windows 10. Depending on your systems’ configuration settings, you can opt for the method.